Bootstrap 4 Custom Forms
Bootstrap 4 Custom Forms
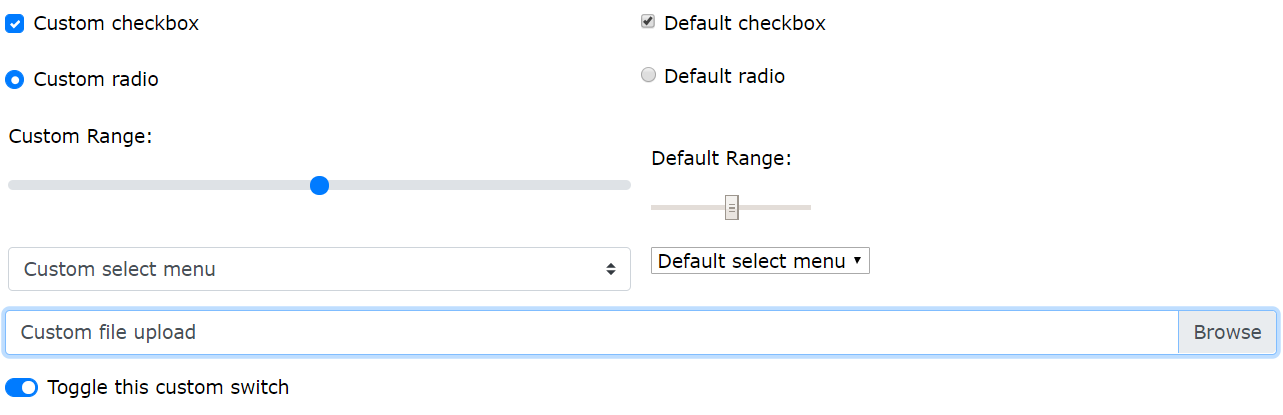
Bootstrap 4 đi kèm với các hình thức tùy chỉnh biểu mẫu, có nghĩa là để thay thế các mặc định của trình duyệt:
Custom Checkbox
Để tạo một custom checkbox, tạo một phần tử bao bọc, như <div> với class .custom-control và .custom-checkbox quanh checkbox. Sau đó add .custom-control-input cho thẻ input với type="checkbox".
Tip: Nếu bạn muốn sử dụng labels cho văn bản đi kèm, add class .custom-control-label cho thẻ label. Lưu ý rằng thuộc tính for trong label phải trùng id của thẻ input:

Ví dụ
<form>
  <div class="custom-control custom-checkbox">
    <input type="checkbox" class="custom-control-input" id="customCheck" name="example1">
    <label class="custom-control-label" for="customCheck">Check this custom checkbox</label>
  </div>
</form>
Custom Switch
Để tạo custom "toggle switch", tạo một phần tử bao bọc, như <div> với class .custom-control và .custom-switch quanh checkbox. Sau đó add class .custom-control-input cho checkbox:

Ví dụ
<form>
  <div class="custom-control custom-switch">
    <input type="checkbox" class="custom-control-input" id="switch1">
    <label class="custom-control-label" for="switch1">Toggle me</label>
  </div>
</form>
Custom Radio buttons
Để tạo custom radio button, tạo một phần tử bao bọc, như <div> với class .custom-control và .custom-radio quanh radio button. Sau đó add .custom-control-input cho thẻ input với type="radio".
Tip: Nếu bạn muốn sử dụng labels cho văn bản đi kèm, add class .custom-control-label cho thẻ label. Lưu ý rằng thuộc tính for trong label phải trùng id của thẻ input:

Ví dụ
<form>
  <div class="custom-control custom-radio">
    <input type="radio" class="custom-control-input" id="customRadio" name="example1" value="customEx">
    <label class="custom-control-label" for="customRadio">Custom radio</label>
  </div>
</form>
Inline Custom Form Controls
Nếu bạn muốn custom form controls hiển thị trên cùng một dòng, add .custom-control-inline cho thẻ chứa chúng:

Ví dụ
<form>
  <div class="custom-control custom-radio custom-control-inline">
    <input type="radio" class="custom-control-input" id="customRadio" name="example" value="customEx">
    <label class="custom-control-label" for="customRadio">Custom radio 1</label>
  </div>
  <div class="custom-control custom-radio custom-control-inline">
    <input type="radio" class="custom-control-input" id="customRadio2" name="example" value="customEx">
    <label class="custom-control-label" for="customRadio2">Custom radio 2</label>
  </div>
</form>
Custom Select Menu
Để tạo custom select menu, add class .custom-select cho thẻ <select>:
Ví dụ
<form>
  <select name="cars" class="custom-select">
    <option selected>Custom Select Menu</option>
    <option value="volvo">Volvo</option>
    <option value="fiat">Fiat</option>
    <option value="audi">Audi</option>
  </select>
</form>
Custom Select Menu Size
Sử dụng class .custom-select-sm để tạo một small select menu và .custom-select-lg để tạo large select menu:
Ví dụ
<form>
  <!-- Small -->
  <select name="cars" class="custom-select-sm">
    <option selected>Small Custom Select Menu</option>
    <option value="volvo">Volvo</option>
    <option value="fiat">Fiat</option>
    <option value="audi">Audi</option>
  </select>

  <!-- Large -->
  <select name="cars" class="custom-select-lg">
    <option selected>Large Custom Select Menu</option>
    <option value="volvo">Volvo</option>
    <option value="fiat">Fiat</option>
    <option value="audi">Audi</option>
  </select>
</form>
Custom Range
Để tạo custom range menu, add class .custom-range cho thẻ input với type="<range>":

Ví dụ
<form>
  <label for="customRange">Custom range</label>
  <input type="range" class="custom-range" id="customRange" name="points1">
</form>
Custom File Upload
Để tạo custom file upload, tạo một phần tử bao bọc, như <div> với class .custom-file quanh thẻ input với type="file". Sau đó add class .custom-file-input cho nó.
Tip: Nếu bạn muốn sử dụng labels cho văn bản đi kèm, add class .custom-control-label cho thẻ label. Lưu ý rằng thuộc tính for trong label phải trùng id của thẻ input:

Default file:
Bạn cần include một đoạn mã jQuery nếu bạn muốn file name hiển thị khi bạn chọn file đó:
Ví dụ
<form>
  <div class="custom-file">
    <input type="file" class="custom-file-input" id="customFile">
    <label class="custom-file-label" for="customFile">Choose file</label>
  </div>
</form>

<script>
// Add the following code if you want the name of the file appear on select
$(".custom-file-input").on("change", function() {
  var fileName = $(this).val().split("\\").pop();
  $(this).siblings(".custom-file-label").addClass("selected").html(fileName);
});
</script>
Tags:
Phản hồi từ học viên
5
(Dựa trên đánh giá ngày hôm nay)